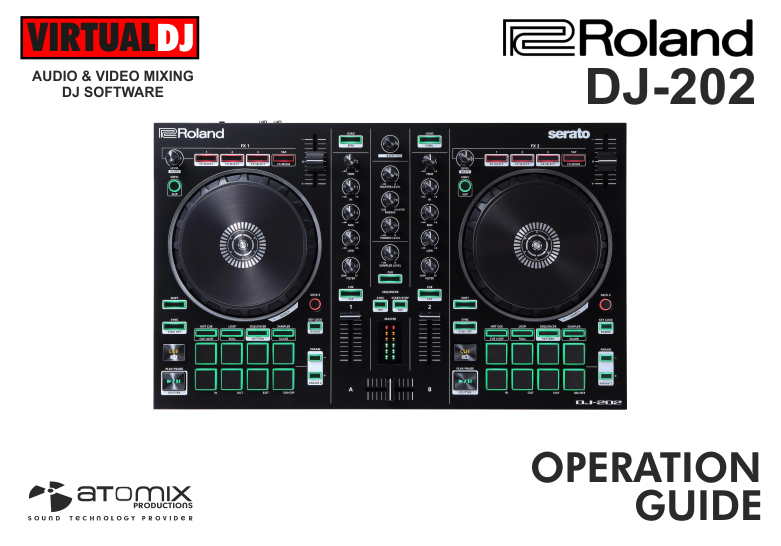
ROLAND DJ-202
SETUP
Firmware & Drivers
Firmware : Update the firmware of the unit to the latest available version from https://www.roland.com/us/support/by_product/dj-202/updates_drivers/
Drivers :
Windows : Your computer automatically downloads* the Windows(R) 10 driver from the Internet when a product requiring the driver is connected to the computer. See further details at https://www.roland.com/us/support/by_product/dj-202/updates_drivers/
* Under normal conditions, the driver installation is completed in several minutes. It may take about 10 minutes depending on the Internet connectivity or if there are other drivers being installed for other devices.
Mac OSX : Download and install the Mac OSX Driver from https://www.roland.com/us/support/by_product/dj-202/updates_drivers/
VirtualDJ 8 Setup
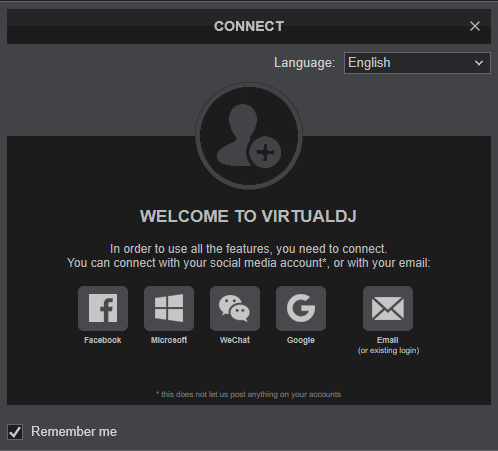
Once VirtualDJ is opened, a Connect Window will appear. Login with your virtualdj.com account’s credentials.
A Pro Infinity, a PLUS or a Pro Subscription License is required to use the Roland DJ-202. Without any of the above Licenses, the controller will operate for 10 minutes each time you restart VirtualDJ.
https://www.virtualdj.com/buy/index.html
Click on the DJ-202 button in order VirtualDJ to apply the pre-defined audio configuration (speakers need to be connected to the rear side of the unit in this case)
Click to OK
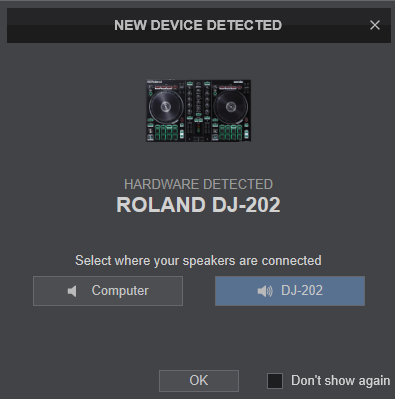
The unit is now ready to operate.
MIDI Operation
The unit should be visible in the MAPPING tab of Settings and the “factory default” available/selected from the Mappings drop-down list.
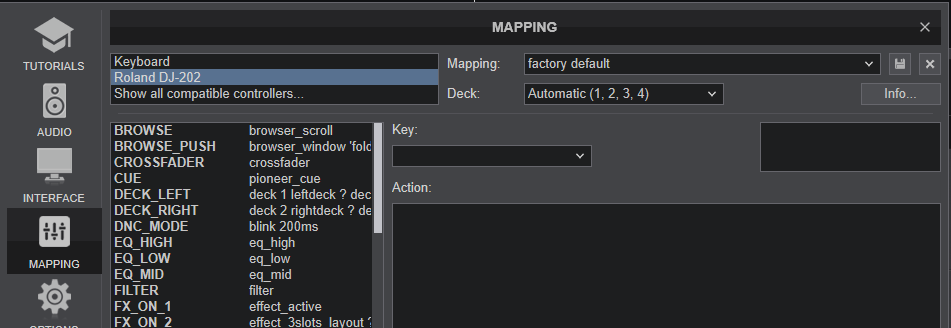
The factory default Mapping offers the functions described in this Manual, however those can be adjusted to your needs via VDJ Script actions.
Find more details at https://www.virtualdj.com/wiki/VDJ8script.html
AUDIO Setup
The unit has a pre-defined Audio setup and a special button in the AUDIO tab of Config to provide that.
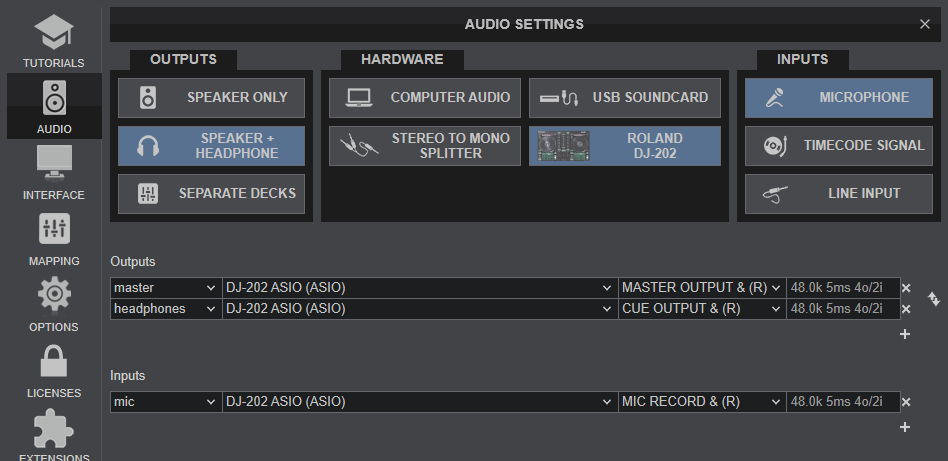
For further software settings please refer to the User Guide of VirtualDJ.
https://www.virtualdj.com/manuals/virtualdj8/index.html
LAYOUT

S SHIFT. Hold this button down to access secondary functions of the Roland DJ-202
The functionality of each button, knob and slider per section (as shown in the image above) will be explained in detail in the following chapters
A Mixer & Browser Controls
B Deck Controls
C Performance Pads
D Effects
E Front & Rear panels
MIXER & BROWSER CONTRLOLS
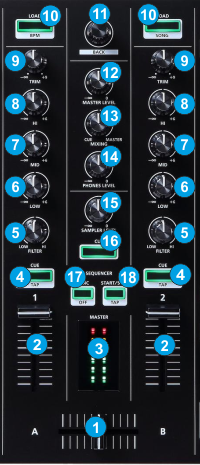
- CROSSFADER: Blends audio between the left and right mixer channels.
- VOLUME: Alter the output Volume of Left/Right Mixer Channel.
- VU-METER: Indicates the level of the Master Output.
- CUE (CH PFL). Press this button to send Left/Right channel's pre-fader signal to the Headphones Channel for monitoring. When engaged, the button will be lit.
Hold SHIFT down and then use the CUE buttons to manually Tap on Tempo for VirtualDJ to calculate a different Tempo and Phase Beat-grid. - FILTER. Use this knob to apply a High/Low-Pass Filter to the Left/Right mixer channel (middle position is Off position - no Filter is applied).
- * EQ-LOW. Adjust the Low (Bass) frequencies of Left/Right mixer channel.
- * EQ-MID. Adjust the Mid (Middle) frequencies of Left/Right mixer channel.
- * EQ-HI. Adjust the High (Treble) frequencies of Left/Right mixer channel.
- TRIM: Adjusts the pre-fader output level (gain) of Left/Right channel mixer.
- LOAD: Press this button to load the selected track from the Browser to Left/Right Deck. Double-press (press twice fast) to clone the track from the opposite deck to the Left/Right Deck.
Hold SHIFT down and then use the left button to sort the tracks of the Files list by BPM (toggles between descending and ascending order).
Hold SHIFT down and then use the right button to sort the tracks of the Files list by Title (toggles between descending and ascending order). - BROWSE Knob/push :
Knob: Scrolls through files or folders. When SHIFT is pressed it scrolls faster (+/- 5 tracks/folders)
Push the knob to select (focus) the next Browser window (Folders List -> Files List -> Sideview and cycle back).
Hold SHIFT down and then push the BROWSE knob to set focus to the Folders list. If focus is on the Folders list, push to expand/collapse sub-folders - MASTER VOLUME : Adjusts the level of the Master Output (RCA Connection at the rear panel). Hardware operation - not visible on VirtualDJ GUI.
- PHONES MIXING: Turn to mix between Cue and Program in the Headphone channel. When all the way to the left, only channels routed to the Headphones channel (via the CUE buttons) will be heard. When all the way to the right, only the Program mix will be heard.
- PHONES LEVEL: Adjusts the level of the Headphones Output (Connection at the front panel). Hardware operation - not visible on VirtualDJ GUI.
- SAMPLER VOLUME : Adjusts the level of the Sampler Output
- CUE (SAMPLER PFL). Press this button to send Sampler signal to the Headphones Channel for monitoring. When engaged, the button will be lit.
- SEQUENCER SYNC : Press this button to turn on the synchronization of the phase of the Sequencer with the phase of the Master Deck.
Hold SHIFT down and then press this button to turn off the phase synchronization. - SEQUENCER START/STOP : Use this button to start/stop the Sequencer playback.
* Note: The device is offering Full Stems controls. See details at EQ Modes
DECK CONTROLS
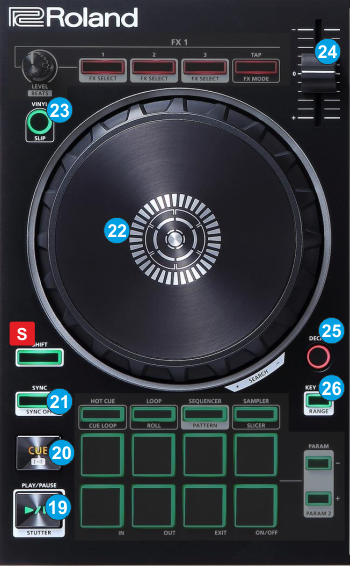
S SHIFT.Hold this button down to access additional functionality for several buttons/knobs as described in this manual.
- PLAY: Play/Pauses the track. Hold SHIFT and then press this button to play the track in Stutter mode (while pressed)
- CUE: When the Deck is paused, you can set a temporary Cue Point by moving the Platter to place the Audio Pointer at the desired location and then pressing the Cue Button. During playback, you can press the Cue Button to return the track to this Cue Point. (If you did not set a Cue Point, then it will return to the beginning of the track.). If the Deck is paused, you can press and hold the Cue Button to play the track from the Temporary Cue Point. Releasing the Cue Button will return the track to the temporary Cue Point and pause it. To continue playback without returning to the Temporary Cue Point, press and hold the Cue Button, then press and hold the Play Button, and then release both buttons.
Hold SHIFT and then press this button to return to the beginning of the track - SYNC: Syncs the deck with the Master Deck. The Master Deck selection is made automatically by VirtualDJ, mostly depending on the Deck that is playing out in Master.
Hold SHIFT and then press this button to manually set a deck as Master Deck and force all other decks to sync to the Master Deck when SYNC is used. To return to the automatic selection, press again the button on the deck that is currently lit. - JOG: Touch sensitive platter for scratching or bending. When in Vinyl mode, use the upper part of the jogwheel to scratch and the outer part to bend. When in Bend mode (Vinyl mode is disabled), use any part of the jogwheel to bend.
Hold SHIFT and use the JOG in Seek (Search) mode. - VINYL: Use this button to toggle between the CD (Bend) and Vinyl (Scratch) modes for the Jogwheel
Hold SHIFT down and then use this button to enable Slip Mode on Left/Right deck. Several software functions (such as Jogwheel movements, HotCues and Loops) will apply temporary on the track, and the track will return to the position it would have been when those functions are not triggered. - PITCH : Pitch fader to adjust the Tempo of the track.
- DECK SELECT: Use these buttons to select a Deck for the left and right side to control. The Left side of the DJ-202 can control decks 1 or 3, and the Right side can control decks 2 or 4.
- KEYLOCK : Use this button to enable/disable Key-Lock (Master Tempo). When enabled, the Key of the track will retain its value when the Tempo of the track is changed.
Hold SHIFT down and then use this button to select the next available % range for the Pitch fader.
PERFORMANCE PADS
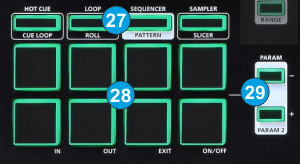
- PAD MODE. Press any of the 4 available Pad mode buttons to set the Pads to Hotcues, Loop, Sequencer or Sampler mode.
Press the same buttons twice to select the additional modes (KeyCue, Manual Loop, TR Velocity and BeatJump)
Hold SHIFT and then press any of the 4 available Pad mode buttons to set the Pads to Cue Loop, Loop Roll, TR Pattern and Slicer mode. While SHIFT is held down, press the same buttons twice to select the additional modes (HC+Manual, Loop+Manual, Sampler+Manual) All 16 available Pad modes are explained in details in this page.
Note : Due to firmware limitation, Split Pages are not offered from the device's Pad mode buttons. - PADS. The 8 Pads offer different functionality depending on the selected mode.
- PARAMETER. Use these buttons to adjust the Parameters of the selected Pad mode.
Read further details about Pads in the VirtualDJ 8 manual
HOTCUES
Each one of the 8 pad assigns a Hot Cue Point (1 to 8) or jumps the track to that Hot Cue Point (if assigned).
When a Hot Cue Button is unlit, you can assign a Hot Cue Point by pressing it at the desired point in your track. Once it is assigned, the Hot Cue Button will light on.
Hold SHIFT and then press a pad to delete its assigned Hot Cue Point.
.
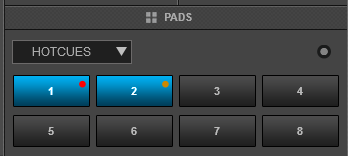
Use the PARAMETER buttons (29) to jump the song to the previous/next assigned HotCue point.
Hold SHIFT and then use the PARAMETER buttons (29) to jump 1 beat backwards/forward
LOOP
Press one of the pads to trigger an Auto Loop of a different size in beats, depending on the selected page. There are 6 different pages available with sizes starting from 1/32 up to 128 beats.
Use the PARAMETER buttons to select the previous/next page with the desired Loop sizes
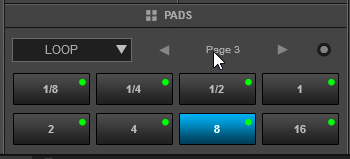
Hold SHIFT and then use the PARAMETER buttons to change the behavior of the Loop pads, by selecting the On/Off (toggle), Hold (momentary – while pad is pressed) or the Roll mode (track will resume to the position it would have been once the pad is released)
SAMPLER
Each one of the 8 pads triggers a sample from the selected Sampler Bank of VirtualDJ. If a bank has less than 9 samples, both sides of the DJ-202 will control the same samples. If a bank has more than 8 samples, the left side of the DJ-202 will control samples 1 to 8 and the right side samples 9 to 16.
Press the pads to trigger a sample. Depending on the selected trigger Pad mode, use SHIFT and the same pads to stop the sample.
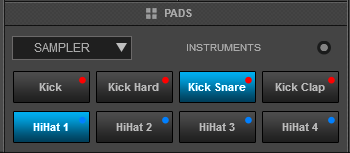
Use the PARAMETER buttons to select the Sampler Bank (previous/next).
Hold SHIFT down and then the PARAMETER buttons to select the Trigger Pad mode (on/off, hold, stutter, unmute)
Key-Cue mode
When Pads are on Hotcues mode, press the same HOTCUE Mode button again to set the Pads to Key-Cue mode (the led of the HOTCUE button will blink). The KeyCue page will be then selected and displayed in the Pads section of the VirtualDJ skins.
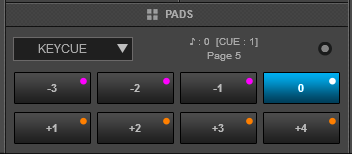
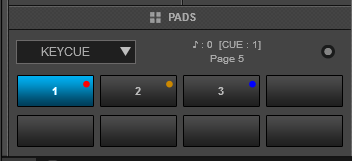
In this mode, the Pads trigger a selected Hotcue point (or the Temporary Cue if none selected or not available) at a selected Key semitone (from -7 to +7).
8 different pages/banks are offered with various semitone values to use and a 0 value (reset key to tis original value) is always offered in all pages.
Hold SHIFT and then select a Hotcue for the Key pads to trigger. Each time a Pad is pressed, the track will jump to that Hotcue point and will also alter the Key of the track to the value designated by it assigned value.
Use PARAMETER buttons -/+ to adjust the Key of the track without trigger a Hotcue.
Hold SHIFT and then use the PARAMETER buttons to select a different page/bank with different key semitone values.
Manual Loop mode
When Pads are on Loop mode, press the same LOOP Mode button again to set the Pads to Manual Loop mode (the led of the LOOP button will blink). The Manual Loop page will be then selected and displayed in the Pads section of the VirtualDJ skins.
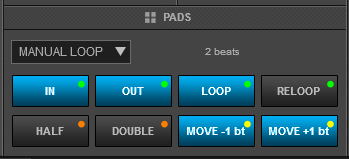
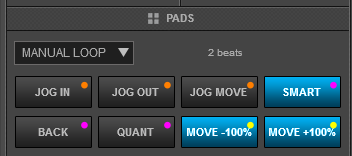
In this mode, the Pads offer the functionality as described below
Use Pads 1 and 2 to set a Loop Entry (In) and a Loop Exit (Out) point for manual looping.
Use Pad 3 to turn off the Loop (if enabled) or trigger a Loop of the selected size in beats
Use Pad 4 to repeat the last triggered loop (reloop)
Use Pads 5 and 6 to half/double the size of the Loop.
Use Pads 7 and 8 to move the Loop (if enabled) forward/backwards by 1 beat
While SHIFT is pressed use ..
Pad 1 to set the Jogwheel to Loop In Adjust mode and use the Jogwheel to fine adjust the Loop In position
Pad 2 to set the Jogwheel to Loop Out Adjust mode and use the Jogwheel to fine adjust the Loop Out position
Pad 3 to set the Jogwheel to Loop Move Adjust mode and use the Jogwheel to fine move the Loop through the track.
Pad 4 to enable/disable Smart Loop. When Smart Loop is enabled (default status), using Loop In and Loop Out buttons to trigger a Manual Loop, will result of a seamless loop (track will stay on beat)
Pad 5 to enable/disable Loop Back mode. When Loop Back mode is enabled, and an Auto Loop is enabled, the current track's position will be considered as the Loop Out (Exit) point of the loop and the passed part of the track will be looped.
Pad 6 to enable/disable Quantize Loop mode. When enabled, the Loop In point of a Loop will be snapped to the nearest beat
Pad 7 and 8 to move the loop (if enabled) forward/backwards by the amount of the size of the loop.
Use PARAMETER buttons -/+ to half/double the size of the Loop.
Beatjump mode
While the Sampler mode is selected, press the same SAMPLER mode button again to set the PADs to Beatjump mode (led will blink). The Beatjump page will be automatically displayed on the Pads section of the VirtualDJ GUI
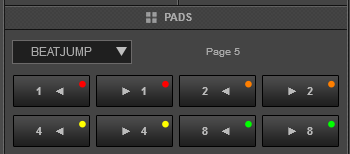
In this mode, each one of the Pads will jump the track backwards/forward by the amount of beats depending on the selected page/bank (from 1/8 beats to 32 bars)
CUE LOOP
In this mode each one of the 8 pads assigns a Hot Cue Point or jumps the track to that Hot Cue Point, but in both cases, it also triggers a Loop at that point (momentary or toggle depending on the selected mode from the Page menu).
Hold SHIFT and then press a pad to stutter/jump to the Hotcue (loop will remain triggered)
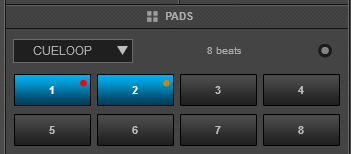
Use the PARAMETER buttons to half/double the size of the triggered Loop.
Hold SHIFT and then use the PARAMETER buttons to select the On/Off (Toggle) or Hold (momentary) Loop trigger mode.
By default the Cue Loops will be quantized. This can be turned off/on from the Page Menu on the GUI.
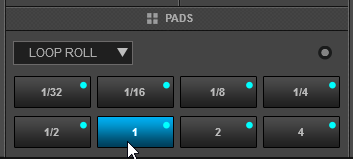
ROLL
Press one of the 8 pads to trigger a momentary Loop Roll. Once the Pad is released, the track will resume playing from the position it would have been if the Loop Roll was never triggered. The exit point will be visible on the waveform of the VirtualDJ GUI with an additional “running” play marker.
Hold SHIFT to get a ½, ¾, 1 and 2 beats Loop Roll sizes for the 4 low pads.
Use the Page menu to apply the Loop Rolls to Video.
The PARAMETER buttons don't have any functionality in this mode.
SLICER
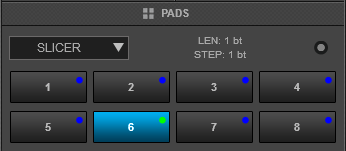
The 8 pads represent eight sequential beats—"Slices"—in the Beat Grid. The currently playing Slice is represented by the currently green lit pad. The light will move through the pads as it progresses through each eight-Slice phrase. Press a pad to repeat that Slice (hold it down if you want to keep looping it).
Once the Pad is released the track will continue to play from the position it would have been if the pad was never pressed.
Hold SHIFT and then use the Pads to repeat the memorized Slices (the Slices played/repeated last time)
Use the PARAMETER buttons to adjust the length of the Loop applied to the slice. Hold SHIFT down and then use the PARAMETER buttons to adjust the step of the Slices
HOTCUES+MANUAL LOOP
While in CueLoop mode, hold SHIFT and then press the HOT CUE mode button again to set the PADs to Hot Cue + Manual Loop mode (button will blink fast) and automatically load a special HC+Manual Pads page in VirtualDJ GUI
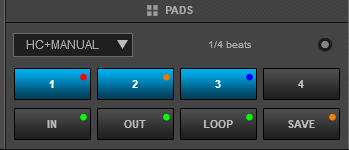
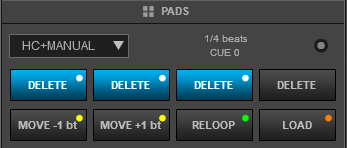
In this mode the 4 upper Pads offer the same functionality as in HotCue mode (trigger or assign Hotcues 1 to 4 and delete them if SHIFT is pressed)
The 4 lower Pads offer manual loop functionality as described below.
Pads 5 and 6 : Set a Loop Entry (In) and a Loop Exit (Out) point for manual looping. When in Loop, use these buttons to set the Jogwheel to Loop In/Out Adjust mode and then use the jogwheel to fine-adjust the Loop In/Out points.
Hold SHIFT down and then use Pads 5 /6 to move the triggered loop backwards/forward by 1 beat
Pad 7 : Turn off the Loop (if enabled) or trigger a Loop of the selected size in beats
Hold SHIFT down and then use this Pad to enable the last triggered loo (re-loop)
Pad 8 : Saves the current loop into a Saved Loop slot. When saved, use this Pad to enable the saved loop, but not jump to its position if later than the current. Hold for more than 2 seconds to delete the Saved Loop
Hold SHIFT down and then use Pad 8 to enable the Saved Loop and jump to its position, regardless if its position is later or not from the current one.
Use PARAMETER buttons -/+ to half/double the size of the Loop.
Hold SHIFT down and then use the PARAMETER buttons to jump to the next HotCue.
LOOP+MANUAL LOOP
While in Loop Roll mode, hold SHIFT and then press the LOOP mode button again to set the PADs to Loop + Manual Loop mode (button will blink fast) and automatically load a special Loop+Manual Pads page in VirtualDJ GUI
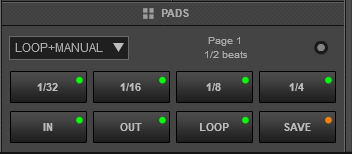
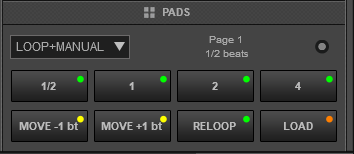
In this mode the 4 upper Pads offer the same functionality as in Loop mode (offer Auto-Loops of different size in beats, depending on the selected page , or if SHIFT is pressed)
The 4 lower Pads offer manual loop functionality as described in the HOTCUES+MANUAL LOOP mode
SAMPLER+MANUAL LOOP
While in Slicer mode, hold SHIFT and then press the SAMPLER mode button again to set the PADs to Sampler + Manual Loop mode (button will blink fast) and automatically load a special Sampler+Manual Pads page in VirtualDJ GUI
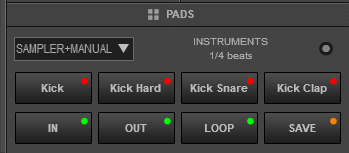
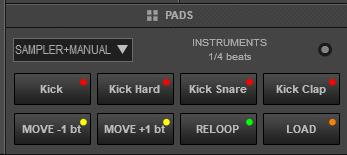
In this mode the 4 upper Pads offer the same functionality as in Sampler mode (trigger Samples 1 to 4 from the selected Sampler Bank)
The 4 lower Pads offer manual loop functionality as described in the HOTCUES+MANUAL LOOP mode
SEQUENCER
The 4 Sequencer modes do not load any Pad page in VirtualDJ, as these operate in hardware way. For details regarding the operation of the Sequencer, please refer to the manual of the unit.. https://www.roland.com/us/products/dj-202/support/
EFFECT CONTROLS

Each one of the left/right FX unit offers Effect controls for the Left and Right assigned decks and can operate in 2 modes. The Single Effects mode offers one effect slot but more parameters controls per effect. The Multi Effects mode offers 3 effect slots (to trigger more than 1 effect at the same time – chained effects). The selection between those 2 modes is done by pressing the TAP (34) button while SHIFT is held.
Single FX mode
Hold SHIFT down and then use the TAP (33) button to select the Single FX mode in the default GUI. The Single FX mode is selected by default on first launch
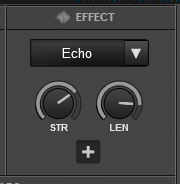

In this mode a single Effect is controlled with up to 6 Parameters and 3 Effect buttons. Only the first 2 Parameters are visible on the GUI. More Parameters and Effect buttons can be viewed in the FX GUI (opened from the + button on the GUI or using SHIFT+FX1 ON from the DJ-202)
- FX1 ON. Press this button to enable/disable the selected effect to the Left/Right selected deck.
Hold SHIFT down and then use this button, to open/close the FX GUI of the selected Effect. - FX2 ON. Press this button to select the previous effect from VirtualDJ Effects list. Hold SHIFT down and then use this button, to enable/disable the 1st effect button of the selected effect (if available).
- FX3 ON. Press this button to select the next effect from VirtualDJ Effects list.
Hold SHIFT down and then use this button, to enable/disable the 2nd effect button of the selected effect (if available). - FX knob. Controls the 1st effect parameter of the selected effect.
Hold SHIFT down to control the 2nd effect parameter of the selected effect (if available).
Multi FX mode
Hold SHIFT down and then use the TAP (51) button to select the Multi FX mode in the default GUI.
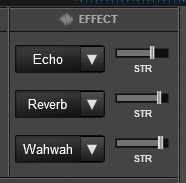

In this mode 3 different Effects can be applied and controlled with up to 2 Parameters for each FX slot. Only the first Parameter is visible on the GUI (and the 2nd Parameter while SHIFT is held on the DJ-505). More Parameters and Effect buttons can be viewed in the FX GUI (opened from the + button on the GUI)
- FX1 ON. Press this button to enable/disable the selected effect of FX slot 1.
- FX2 ON. Press this button to enable/disable the selected effect of FX slot 2.
- FX3 ON. Press this button to enable/disable the selected effect of FX slot 3.
- FX knob. Controls the 1st parameter of the selected effect of all 3 FX slots simultaneously.
Hold SHIFT to control the 2nd parameter of the selected effect of all 3 FX slots simultaneously.
OTHER FX KEYS
- TAP While track is playing, tap this button on beat - at least 4 times - to manually set the tempo (BPM) of the loaded track.
Hold SHIFT down and then this button to toggle between the Single and Multi Effect modes.
FRONT & REAR PANELS

- HEADPHONES SOCKET. Connect your 1/4" headphones to this output for cueing and mix monitoring. The level of this output is controlled from the top panel

Rear panel - USB. This USB connection sends and receives audio and control information from a connected computer.
- MIDI OUT This connection outputs MIDI messages such as MIDI clock.
- MASTER OUT Connect your powered speakers or power amp here using proper RCA cables. The level of this output is controlled by the MASTER LEVEL knob at the top panel
- MIC INPUT. Connect your microphone to this socket using a TRS 1/4" cable
- MIC SENS Adjusts the mic input sensitivity.
Microphone Input & Recording
The Roland DJ-202 offers a Microphone Input at the rear panel to connect your Microphone. The signal of this input is routed directly to the Master Output (rear panel socket). However, a special USB Audio Input is offered to also pass the signal of the Microphone Input so that it can be recorded along with your mix.
This input is already pre-configured in the Audio setup of the Roland DJ-202, when the special button at the top is clicked.

In order to record the Microphone Input along with your mix, the MIC ON button needs to be enabled at the MASTER mixer panel of the default VirtualDJ GUIs.

Important Note
Due to firmware and audio routing of the Roland DJ-202, the Sequencer playback is not recorded.
